obsei — AI Agent 工作流中文教程
AI Skill Hub 强烈推荐:obsei — AI Agent 工作流中文教程 是一款优质的Agent工作流。已获得 1.4k 颗 GitHub Star,AI 综合评分 8.5 分,在同类工具中表现稳健。如果你正在寻找可靠的Agent工作流解决方案,这是一个值得深入了解的选择。
obsei — AI Agent 工作流中文教程 工作流的设计遵循"最小配置,最大复用"原则:核心逻辑已经封装好,用户只需配置自己的 API Key 和业务参数即可快速上手。工作流内置错误处理和重试机制,在网络波动或 API 限速等情况下仍能稳定运行,适合作为生产环境的自动化基础设施。
在实际部署时,建议先在测试环境中运行 3-5 次,验证各个环节的输出结果符合预期,再部署到生产环境。AI Skill Hub 评分 8.5 分,是同类 Agent 工作流中的精选推荐。
obsei — AI Agent 工作流中文教程 是一套完整的 AI Agent 自动化工作流方案。通过可视化的节点编排,将复杂的多步骤任务拆解为清晰的自动化流程,实现全程无人值守的智能处理。支持与数百种外部服务和 API 无缝集成,适合构建数据处理管线、业务自动化和 AI 辅助决策系统。
obsei — AI Agent 工作流中文教程 是一套完整的 AI Agent 自动化工作流方案。通过可视化的节点编排,将复杂的多步骤任务拆解为清晰的自动化流程,实现全程无人值守的智能处理。支持与数百种外部服务和 API 无缝集成,适合构建数据处理管线、业务自动化和 AI 辅助决策系统。
- 可视化 Agent 工作流编排,无需编写复杂代码
- 支持多步骤自动化任务链,实现全流程无人值守
- 与外部 API、数据库和第三方服务无缝集成
- 内置错误处理与自动重试机制,保障稳定运行
- 提供可复用的自动化模板,快速在同类场景部署
- 自动化日常重复性工作,将精力集中于创造性任务
- 构建数据采集 → 处理 → 输出的完整自动化管线
- 实现跨平台、跨系统的数据流转和业务协同
# 方式一:pip 安装(推荐)
pip install obsei

# 方式二:虚拟环境安装(推荐生产环境)
python -m venv .venv
source .venv/bin/activate  # Windows: .venv\Scripts\activate
pip install obsei

# 方式三:从源码安装(获取最新功能)
git clone https://github.com/obsei/obsei
cd obsei
pip install -e .

# 验证安装
python -c "import obsei; print('安装成功')"
- 访问 GitHub 仓库获取工作流文件
- 在对应平台(Dify / Flowise / Make 等)中找到「导入工作流」功能
- 上传工作流文件
- 按照提示配置必要的环境变量和 API Key
- 运行测试确认流程正常后投入使用
# 命令行使用
obsei --help

# 基本用法
obsei input_file -o output_file

# Python 代码中调用
import obsei

# 示例
result = obsei.process("input")
print(result)
# obsei 配置文件示例(config.yml)
app:
  name: "obsei"
  debug: false
  log_level: "INFO"

# 运行时指定配置文件
obsei --config config.yml

# 或通过环境变量配置
export OBSEI_API_KEY="your-key"
export OBSEI_OUTPUT_DIR="./output"
简介
<p align="center"> <img src="https://raw.githubusercontent.com/obsei/obsei-resources/master/images/obsei-flyer.png" /> </p>
--- <p align="center"> <a href="https://www.oraika.com"> <img src="https://static.wixstatic.com/media/59bc4e_971f153f107e48c7912b9b2d4cd1b1a4~mv2.png/v1/fill/w_177,h_49,al_c,q_85,usm_0.66_1.00_0.01,enc_auto/3_edited.png" /> </a> </p> <p align="center"> <a href="https://github.com/obsei/obsei/actions"> <img alt="Test" src="https://github.com/obsei/obsei/workflows/CI/badge.svg?branch=master"> </a> <a href="https://github.com/obsei/obsei/blob/master/LICENSE"> <img alt="License" src="https://img.shields.io/pypi/l/obsei"> </a> <a href="https://pypi.org/project/obsei"> <img src="https://img.shields.io/pypi/pyversions/obsei" alt="PyPI - Python Version" /> </a> <a href="https://pypi.org/project/obsei/"> <img alt="Release" src="https://img.shields.io/pypi/v/obsei"> </a> <a href="https://pepy.tech/project/obsei"> <img src="https://pepy.tech/badge/obsei/month" alt="Downloads" /> </a> <a href="https://huggingface.co/spaces/obsei/obsei-demo"> <img src="https://img.shields.io/badge/%F0%9F%A4%97%20Hugging%20Face-Spaces-blue" alt="HF Spaces" /> </a> <a href="https://github.com/obsei/obsei/commits/master"> <img alt="Last commit" src="https://img.shields.io/github/last-commit/obsei/obsei"> </a> <a href="https://github.com/obsei/obsei"> <img alt="Github stars" src="https://img.shields.io/github/stars/obsei/obsei?style=social"> </a> <a href="https://www.youtube.com/channel/UCqdvgro1BzU13tkAfX3jCJA"> <img alt="YouTube Channel Subscribers" src="https://img.shields.io/youtube/channel/subscribers/UCqdvgro1BzU13tkAfX3jCJA?style=social"> </a> <a href="https://join.slack.com/t/obsei-community/shared_invite/zt-r0wnuz02-FAkAmhTAUoc6pD4SLB9Ikg"> <img src="https://raw.githubusercontent.com/obsei/obsei-resources/master/logos/Slack_join.svg" height="30"> </a> <a href="https://twitter.com/ObseiAI"> <img src="https://img.shields.io/twitter/follow/ObseiAI?style=social"> </a> </p>
---

---
<span style="color:red"> <b>Note</b>: Obsei is still in alpha stage hence carefully use it in Production. Also, as it is constantly undergoing development hence master branch may contain many breaking changes. Please use released version. </span>
---
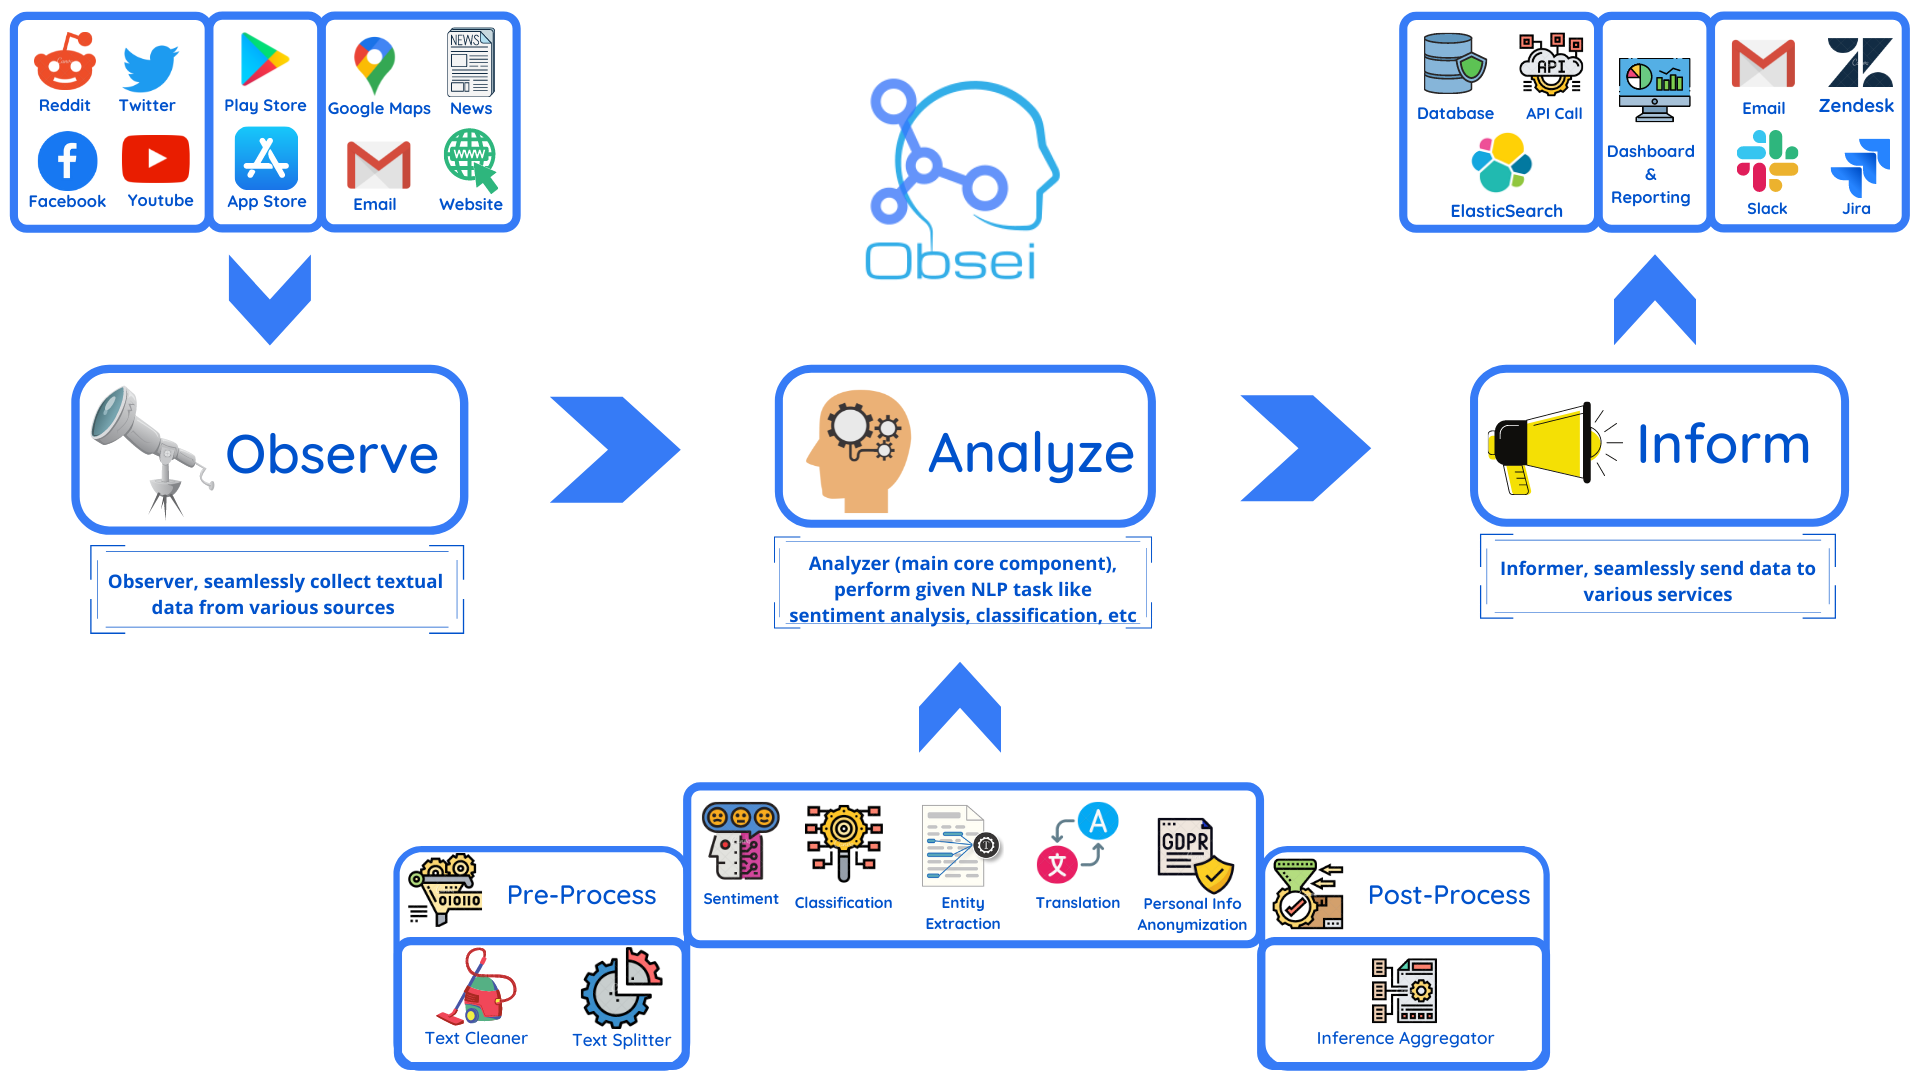
Obsei (pronounced "Ob see" | /əb-'sē/) is an open-source, low-code, AI powered automation tool. Obsei consists of -
- Observer: Collect unstructured data from various sources like tweets from Twitter, Subreddit comments on Reddit, page post's comments from Facebook, App Stores reviews, Google reviews, Amazon reviews, News, Website, etc.
- Analyzer: Analyze unstructured data collected with various AI tasks like classification, sentiment analysis, translation, PII, etc.
- Informer: Send analyzed data to various destinations like ticketing platforms, data storage, dataframe, etc so that the user can take further actions and perform analysis on the data.
All the Observers can store their state in databases (Sqlite, Postgres, MySQL, etc.), making Obsei suitable for scheduled jobs or serverless applications.
Prerequisite
Install the following (if not present already) -
- Install Python 3.7+
- Install PIP
Installation
Install Obsei
You can install Obsei either via PIP or Conda based on your preference. To install latest released version -
pip install obsei[all]Install from master branch (if you want to try the latest features) -
git clone https://github.com/obsei/obsei.git
cd obsei
pip install --editable .[all]all option will install all the dependencies which might not be needed for your workflow, alternatively following options are available to install minimal dependencies as per need - - pip install obsei[source]: To install dependencies related to all observers - pip install obsei[sink]: To install dependencies related to all informers - pip install obsei[analyzer]: To install dependencies related to all analyzers, it will install pytorch as well - pip install obsei[twitter-api]: To install dependencies related to Twitter observer - pip install obsei[google-play-scraper]: To install dependencies related to Play Store review scrapper observer - pip install obsei[google-play-api]: To install dependencies related to Google official play store review API based observer - pip install obsei[app-store-scraper]: To install dependencies related to Apple App Store review scrapper observer - pip install obsei[reddit-scraper]: To install dependencies related to Reddit post and comment scrapper observer - pip install obsei[reddit-api]: To install dependencies related to Reddit official api based observer - pip install obsei[pandas]: To install dependencies related to TSV/CSV/Pandas based observer and informer - pip install obsei[google-news-scraper]: To install dependencies related to Google news scrapper observer - pip install obsei[facebook-api]: To install dependencies related to Facebook official page post and comments api based observer - pip install obsei[atlassian-api]: To install dependencies related to Jira official api based informer - pip install obsei[elasticsearch]: To install dependencies related to elasticsearch informer - pip install obsei[slack-api]:To install dependencies related to Slack official api based informer
You can also mix multiple dependencies together in single installation command. For example to install dependencies Twitter observer, all analyzer, and Slack informer use following command -
pip install obsei[twitter-api, analyzer, slack-api]For testing purpose you can start Elasticsearch server locally via docker
`docker run -d --name elasticsearch -p 9200:9200 -e "discovery.type=single-node" elasticsearch:8.5.0`
Use cases
Obsei use cases are following, but not limited to -
- Social listening: Listening about social media posts, comments, customer feedback, etc.
- Alerting/Notification: To get auto-alerts for events such as customer complaints, qualified sales leads, etc.
- Automatic customer issue creation based on customer complaints on Social Media, Email, etc.
- Automatic assignment of proper tags to tickets based content of customer complaint for example login issue, sign up issue, delivery issue, etc.
- Extraction of deeper insight from feedbacks on various platforms
- Market research
- Creation of dataset for various AI tasks
- Many more based on creativity 💡
How to use
Expand the following steps and create a workflow -
<details><summary><b>Step 1: Configure Source/Observer</b></summary>
| ||||||||||||||||||||||||||||||||||||||||||||
| Sr. No. | Workflow | Colab | Binder |
|---|---|---|---|
| 1 | Observe app reviews from Google play store, Analyze them by performing text classification and then Inform them on console via logger | ||
| PlayStore Reviews → Classification → Logger |
|
|
|
| 2 | Observe app reviews from Google play store, PreProcess text via various text cleaning functions, Analyze them by performing text classification, Inform them to Pandas DataFrame and store resultant CSV to Google Drive | ||
| PlayStore Reviews → PreProcessing → Classification → Pandas DataFrame → CSV in Google Drive |
|
|
|
| 3 | Observe app reviews from Apple app store, PreProcess text via various text cleaning function, Analyze them by performing text classification, Inform them to Pandas DataFrame and store resultant CSV to Google Drive | ||
| AppStore Reviews → PreProcessing → Classification → Pandas DataFrame → CSV in Google Drive |
|
|
|
| 4 | Observe news article from Google news, PreProcess text via various text cleaning function, Analyze them via performing text classification while splitting text in small chunks and later computing final inference using given formula | ||
| Google News → Text Cleaner → Text Splitter → Classification → Inference Aggregator |
|
|
|
<details><summary><b>💡Tips: Handle large text classification via Obsei</b></summary>

</details>
Demo
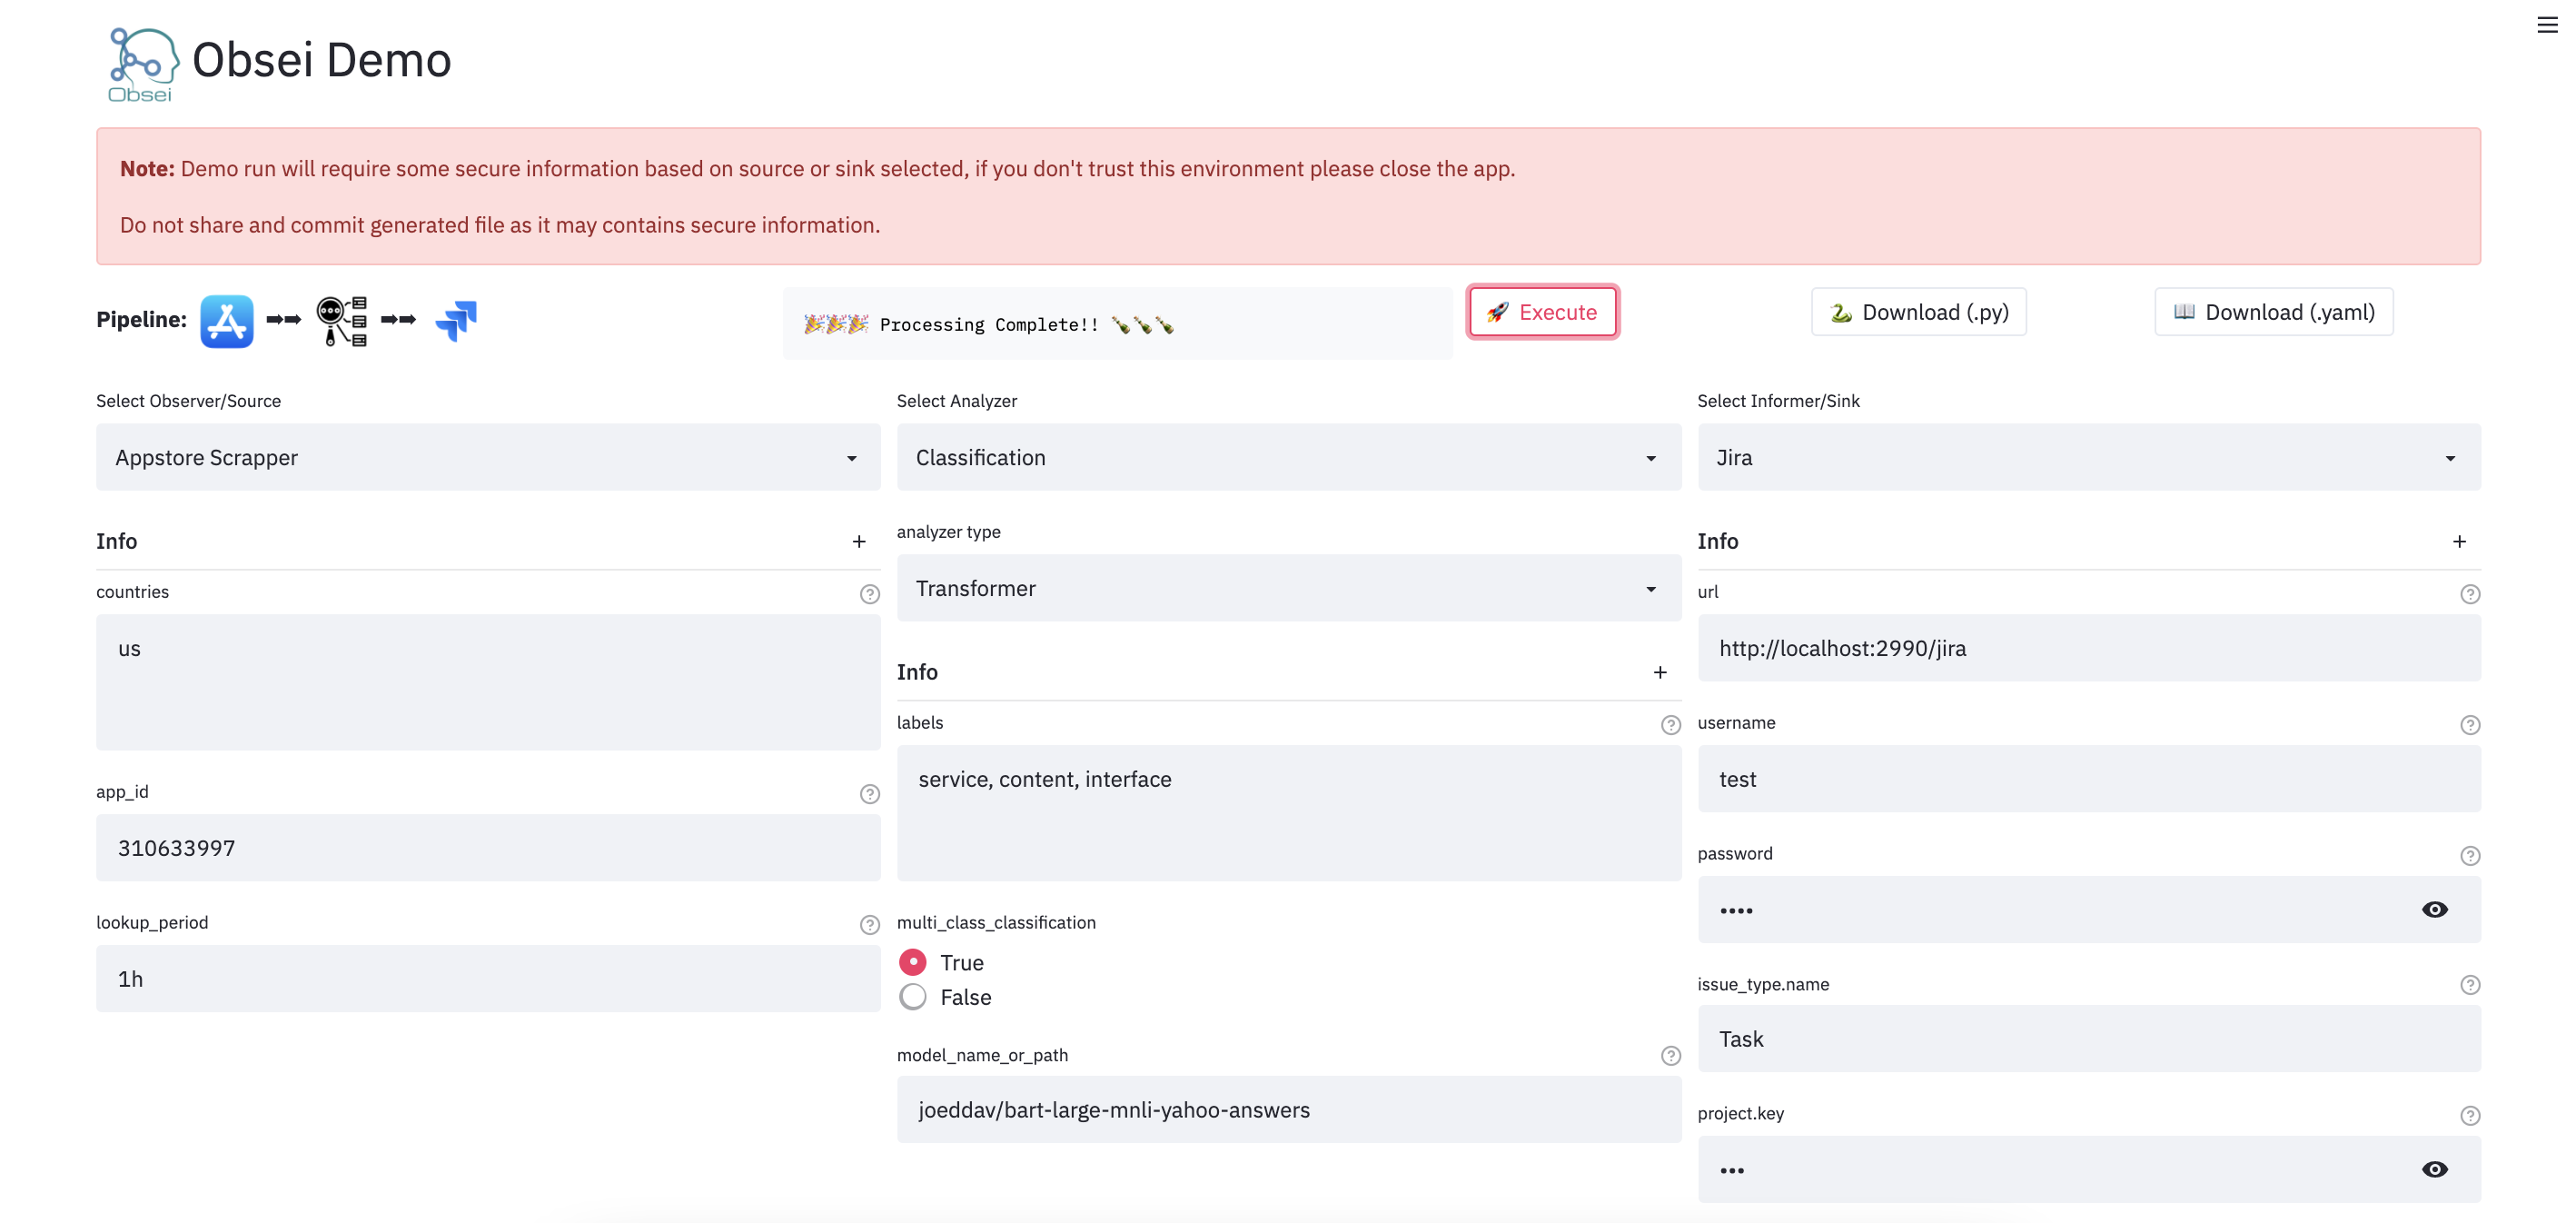
We have a minimal streamlit based UI that you can use to test Obsei.
Watch UI demo video
Check demo at
(Note: Sometimes the Streamlit demo might not work due to rate limiting, use the docker image (locally) in such cases.)
To test locally, just run
``` docker run -d --name obesi-ui -p 8501:8501 obsei/obsei-ui-demo
initialize twitter source config
source_config = TwitterSourceConfig( keywords=["issue"], # Keywords, @user or #hashtags lookup_period="1h", # Lookup period from current time, format: <number><d|h|m> (day|hour|minute) cred_info=TwitterCredentials( # Enter your twitter consumer key and secret. Get it from https://developer.twitter.com/en/apply-for-access consumer_key="<twitter_consumer_key>", consumer_secret="<twitter_consumer_secret>", bearer_token='<ENTER BEARER TOKEN>', ) )
initialize Youtube source config
source_config = YoutubeScrapperConfig( video_url="https://www.youtube.com/watch?v=uZfns0JIlFk", # Youtube video URL fetch_replies=True, # Fetch replies to comments max_comments=10, # Total number of comments and replies to fetch lookup_period="1Y", # Lookup period from current time, format: <number><d|h|m|M|Y> (day|hour|minute|month|year) )
initialize facebook source config
source_config = FacebookSourceConfig( page_id="110844591144719", # Facebook page id, for example this one for Obsei lookup_period="1h", # Lookup period from current time, format: <number><d|h|m> (day|hour|minute) cred_info=FacebookCredentials( # Enter your facebook app_id, app_secret and long_term_token. Get it from https://developers.facebook.com/apps/ app_id="<facebook_app_id>", app_secret="<facebook_app_secret>", long_term_token="<facebook_long_term_token>", ) )
initialize email source config
source_config = EmailConfig( # List of IMAP servers for most commonly used email providers # https://www.systoolsgroup.com/imap/ # Also, if you're using a Gmail account then make sure you allow less secure apps on your account - # https://myaccount.google.com/lesssecureapps?pli=1 # Also enable IMAP access - # https://mail.google.com/mail/u/0/#settings/fwdandpop imap_server="imap.gmail.com", # Enter IMAP server cred_info=EmailCredInfo( # Enter your email account username and password username="<email_username>", password="<email_password>" ), lookup_period="1h" # Lookup period from current time, format: <number><d|h|m> (day|hour|minute) )
initialize Outscrapper Maps review source config
source_config = OSGoogleMapsReviewsConfig( # Collect API key from https://outscraper.com/ api_key="<Enter Your API Key>", # Enter Google Maps link or place id # For example below is for the "Taj Mahal" queries=["https://www.google.co.in/maps/place/Taj+Mahal/@27.1751496,78.0399535,17z/data=!4m5!3m4!1s0x39747121d702ff6d:0xdd2ae4803f767dde!8m2!3d27.1751448!4d78.0421422"], number_of_reviews=10, )
initialize app store source config
source_config = AppStoreScrapperConfig( # Need two parameters app_id and country. # app_id can be found at the end of the url of app in app store. # For example - https://apps.apple.com/us/app/xcode/id497799835 # 310633997 is the app_id for xcode and us is country. countries=["us"], app_id="310633997", lookup_period="1h" # Lookup period from current time, format: <number><d|h|m> (day|hour|minute) )
initialize play store source config
source_config = PlayStoreScrapperConfig( # Need two parameters package_name and country. # package_name can be found at the end of the url of app in play store. # For example - https://play.google.com/store/apps/details?id=com.google.android.gm&hl=en&gl=US # com.google.android.gm is the package_name for xcode and us is country. countries=["us"], package_name="com.google.android.gm", lookup_period="1h" # Lookup period from current time, format: <number><d|h|m> (day|hour|minute) )
initialize reddit source config
source_config = RedditConfig( subreddits=["wallstreetbets"], # List of subreddits # Reddit account username and password # You can also enter reddit client_id and client_secret or refresh_token # Create credential at https://www.reddit.com/prefs/apps # Also refer https://praw.readthedocs.io/en/latest/getting_started/authentication.html # Currently Password Flow, Read Only Mode and Saved Refresh Token Mode are supported cred_info=RedditCredInfo( username="<reddit_username>", password="<reddit_password>" ), lookup_period="1h" # Lookup period from current time, format: <number><d|h|m> (day|hour|minute) )
initialize reddit scrapper source config
source_config = RedditScrapperConfig( # Reddit subreddit, search etc rss url. For proper url refer following link - # Refer https://www.reddit.com/r/pathogendavid/comments/tv8m9/pathogendavids_guide_to_rss_and_reddit/ url="https://www.reddit.com/r/wallstreetbets/comments/.rss?sort=new", lookup_period="1h" # Lookup period from current time, format: <number><d|h|m> (day|hour|minute) )
initialize Google News source config
source_config = GoogleNewsConfig( query='bitcoin', max_results=5, # To fetch full article text enable fetch_article flag # By default google news gives title and highlight fetch_article=True, # proxy='http://127.0.0.1:8080' )
initialize website crawler source config
source_config = TrafilaturaCrawlerConfig( urls=['https://obsei.github.io/obsei/'] )
initialize pandas sink config
sink_config = PandasSourceConfig( dataframe=dataframe, include_columns=["score"], text_columns=["name", "degree"], )
initialize classification analyzer config
Vader does not need any configuration settings
analyzer_config=None
NER analyzer does not need configuration settings
analyzer_config=None
Translator does not need analyzer config
analyzer_config = None
initialize pii analyzer's config
analyzer_config = PresidioPIIAnalyzerConfig( # Whether to return only pii analysis or anonymize text analyze_only=False, # Whether to return detail information about anonymization decision return_decision_process=True )
initialize dummy analyzer's configuration settings
analyzer_config = DummyAnalyzerConfig()
initialize slack sink config
sink_config = SlackSinkConfig( # Provide slack bot/app token # For more detail refer https://slack.com/intl/en-de/help/articles/215770388-Create-and-regenerate-API-tokens slack_token="<Slack_app_token>", # To get channel id refer https://stackoverflow.com/questions/40940327/what-is-the-simplest-way-to-find-a-slack-team-id-and-a-channel-id channel_id="C01LRS6CT9Q" )
initialize zendesk sink config
sink_config = ZendeskSinkConfig( # provide zendesk domain domain="zendesk.com", # provide subdomain if you have one subdomain=None, # Enter zendesk user details cred_info=ZendeskCredInfo( email="<zendesk_user_email>", password="<zendesk_password>" ) )
initialize Jira sink config
sink_config = JiraSinkConfig( url="http://localhost:2990/jira", # Jira server url # Jira username & password for user who have permission to create issue username="<username>", password="<password>", # Which type of issue to be created # For more information refer https://support.atlassian.com/jira-cloud-administration/docs/what-are-issue-types/ issue_type={"name": "Task"}, # Under which project issue to be created # For more information refer https://support.atlassian.com/jira-software-cloud/docs/what-is-a-jira-software-project/ project={"key": "CUS"}, )
initialize Elasticsearch sink config
sink_config = ElasticSearchSinkConfig( # Elasticsearch server hosts="http://localhost:9200", # Index name, it will create if not exist index_name="test", )
For more details refer https://learning.postman.com/docs/designing-and-developing-your-api/mocking-data/setting-up-mock/
initialize http sink config (Currently only POST call is supported)
sink_config = HttpSinkConfig( # provide http server url url="https://localhost:8080/api/path", # Here you can add headers you would like to pass with request headers={ "Content-type": "application/json" } )
initialize pandas sink config
sink_config = PandasSinkConfig( dataframe=DataFrame() )
initialize logger sink config
sink_config = LoggerSinkConfig( logger=logger, level=logging.INFO )
logging.basicConfig(stream=sys.stdout, level=logging.INFO)
This will fetch information from configured source ie twitter, app store etc
source_response_list = source.lookup(source_config)
This will execute analyzer (Sentiment, classification etc) on source data with provided analyzer_config
analyzer_response_list = text_analyzer.analyze_input( source_response_list=source_response_list, analyzer_config=analyzer_config )
This will send analyzed output to configure sink ie Slack, Zendesk etc
sink_response_list = sink.send_data(analyzer_response_list, sink_config)
Refer https://developer.atlassian.com/server/framework/atlassian-sdk/atlas-run-standalone/
For supported models refer https://huggingface.co/models?filter=zero-shot-classification
text_analyzer = ZeroShotClassificationAnalyzer( model_name_or_path="typeform/mobilebert-uncased-mnli", device="auto" )
</details>
</td>
</tr>
<tr>
<td><details ><summary><img style="vertical-align:middle;margin:2px 10px" src="https://raw.githubusercontent.com/obsei/obsei-resources/master/logos/sentiment.png" width="20" height="20"><b>Sentiment Analyzer</b></summary><hr>

Sentiment Analyzer: Detect the sentiment of the text. Text classification can also perform sentiment analysis but if you don't want to use heavy-duty NLP model then use less resource hungry dictionary based Vader Sentiment detector.
For supported models refer https://huggingface.co/models?filter=token-classification
text_analyzer = NERAnalyzer( model_name_or_path="elastic/distilbert-base-cased-finetuned-conll03-english", device = "auto" )
</details>
</td>
</tr>
<tr>
<td><details ><summary><img style="vertical-align:middle;margin:2px 10px" src="https://raw.githubusercontent.com/obsei/obsei-resources/master/logos/translator.png" width="20" height="20"><b>Translator</b></summary><hr>
For supported models refer https://huggingface.co/models?pipeline_tag=translation
analyzer = TranslationAnalyzer( model_name_or_path="Helsinki-NLP/opus-mt-hi-en", device = "auto" )
</details>
</td>
</tr>
<tr>
<td><details ><summary><img style="vertical-align:middle;margin:2px 10px" src="https://raw.githubusercontent.com/obsei/obsei-resources/master/logos/pii.png" width="20" height="20"><b>PII Anonymizer</b></summary><hr>
- 跨境业务、多语言内容运营团队
- 生产部署优先使用 Docker Compose 隔离依赖,并挂载 volume 持久化数据
- API key 直接提交到 git 仓库(请用 .env 并加入 .gitignore)
- 容器内无法访问宿主机 localhost — 使用 host.docker.internal
- Python 依赖冲突:建议用 venv / uv 隔离环境
- Docker:obsei 提供官方镜像,docker compose up 一键启动
- 云端托管:可放在 Vercel / Railway / Fly.io 等 PaaS 平台
- 可视化 Agent 工作流编排,无需编写复杂代码
- 支持多步骤自动化任务链,实现全流程无人值守
- 与外部 API、数据库和第三方服务无缝集成
- 内置错误处理与自动重试机制,保障稳定运行
- 提供可复用的自动化模板,快速在同类场景部署
- 自动化日常重复性工作,将精力集中于创造性任务
- 构建数据采集 → 处理 → 输出的完整自动化管线
- 实现跨平台、跨系统的数据流转和业务协同
- +Apache-2.0 协议,可免费商用
- +大幅减少重复性人工操作
- +可视化流程,清晰直观
- +可扩展性强,支持复杂场景
- −初始配置和调试需投入一定时间
- −强依赖外部服务的稳定性
- −复杂场景需具备一定技术基础
AI Skill Hub 为第三方内容聚合平台,本页面信息基于公开数据整理,不对工具功能和质量作任何法律背书。
建议在沙箱或测试环境中充分验证后,再部署至生产环境,并做好必要的安全评估。
✅ Apache 2.0 — 宽松开源协议,可商用,需保留版权声明和 NOTICE 文件,含专利授权条款。
总体来看,obsei — AI Agent 工作流中文教程 是一款质量优秀的Agent工作流,在同类工具中具备一定竞争力。AI Skill Hub 将持续追踪其更新动态,建议收藏备用,结合自身场景选择合适时机引入使用。
| 原始名称 | obsei |
| 原始描述 | Obsei is a low code AI powered automation tool. It can be used in various business flows like social listening, AI based alerting, brand image analysis, comparative study and more . |
| Topics | anonymizationartificial-intelligencebusiness-process-automationcustomer-engagementcustomer-supportissue-tracking-systemautomation |
| GitHub | https://github.com/obsei/obsei |
| License | Apache-2.0 |
| 语言 | Python |
收录时间:2026-05-22 · 更新时间:2026-05-22 · License:Apache-2.0 · AI Skill Hub 不对第三方内容的准确性作法律背书。
🤖 交给 Agent 安装 · obsei — AI Agent 工作流中文教程
选择 Agent 类型,复制安装指令后粘贴到对应客户端