
inspector MCP工具
AI Skill Hub 强烈推荐:inspector MCP工具 是一款优质的MCP工具。已获得 9.8k 颗 GitHub Star,AI 综合评分 8.5 分,在同类工具中表现稳健。如果你正在寻找可靠的MCP工具解决方案,这是一个值得深入了解的选择。
📚 深度解析
通过安装 inspector MCP工具,你的 AI 助手将获得额外的工具调用能力,可以用自然语言直接操控该工具的功能,无需学习复杂的命令行语法。MCP 工具的核心价值在于"一次配置,永久增强"——配置完成后,每次与 AI 对话时都可以无缝调用这些工具。
在技术实现上,MCP 工具通过标准的 JSON-RPC 协议与 AI 客户端通信,工具的功能以"工具列表"的形式暴露给 AI 模型,AI 可以按需调用。inspector MCP工具 提供了结构化的工具调用接口,使 AI 模型能够精确地理解和使用每个功能点,显著降低 AI 在工具使用上的错误率。
与传统的 API 集成相比,MCP 工具的优势在于无需编写代码——用户只需在配置文件中添加几行 JSON,即可让 AI 获得全新能力。AI Skill Hub 将 inspector MCP工具 评为 AI 评分 8.5 分,属于同类工具中的优质选择。
📋 工具概览
专为MCP(Model Context Protocol)服务器设计的可视化测试工具。提供直观的界面进行MCP服务器功能测试、调试和验证,帮助开发者快速定位问题。适合MCP服务器开发者和集成测试人员使用。
inspector MCP工具 是一款遵循 MCP(Model Context Protocol)标准协议的 AI 工具扩展。通过 MCP 协议,它可以让 Claude、Cursor 等主流 AI 客户端直接访问和操作外部工具、数据源和服务,实现 AI 能力的无缝扩展。无论是文件操作、数据库查询还是 API 调用,都可以通过自然语言在 AI 对话中直接触发,极大提升生产效率。
📖 中文文档
专为MCP(Model Context Protocol)服务器设计的可视化测试工具。提供直观的界面进行MCP服务器功能测试、调试和验证,帮助开发者快速定位问题。适合MCP服务器开发者和集成测试人员使用。
inspector MCP工具 是一款遵循 MCP(Model Context Protocol)标准协议的 AI 工具扩展。通过 MCP 协议,它可以让 Claude、Cursor 等主流 AI 客户端直接访问和操作外部工具、数据源和服务,实现 AI 能力的无缝扩展。无论是文件操作、数据库查询还是 API 调用,都可以通过自然语言在 AI 对话中直接触发,极大提升生产效率。
- 通过标准 MCP 协议与 Claude、Cursor 等主流 AI 客户端深度集成
- 提供结构化工具调用接口,显著降低 AI 集成复杂度
- 支持 Claude Desktop 和 Claude Code 无缝接入,开箱即用
- 可与其他 MCP 工具组合叠加,构建完整 AI 工作站
- 轻量无侵入设计,不影响现有系统架构
- 在 Claude Desktop 对话中直接调用本地工具,实现 AI 与系统的深度联动
- 通过自然语言驱动复杂的多步骤自动化任务,代替繁琐手动操作
- 将多个 MCP 工具组合使用,构建个人专属 AI 工作站
# 方式一:通过 Claude Code CLI 一键安装
claude skill install https://github.com/modelcontextprotocol/inspector

# 方式二:手动配置 claude_desktop_config.json
{
  "mcpServers": {
    "inspector-mcp--": {
      "command": "npx",
      "args": ["-y", "inspector"]
    }
  }
}

# 配置文件位置
# macOS: ~/Library/Application Support/Claude/claude_desktop_config.json
# Windows: %APPDATA%/Claude/claude_desktop_config.json
- 确认已安装 Node.js(v18 或以上版本)
- 打开 Claude Desktop 或 Claude Code 的 MCP 配置文件
- 按「交给 Agent 安装 → Claude Desktop」标签中的 JSON 配置填入 mcpServers 字段
- 保存配置文件并重启 Claude 客户端
- 重启后,在对话中即可使用本工具
# 安装后在 Claude 对话中直接使用
# 示例:
用户: 请帮我用 inspector MCP工具 执行以下任务...
Claude: [自动调用 inspector MCP工具 MCP 工具处理请求]

# 查看可用工具列表
# 在 Claude 中输入:"列出所有可用的 MCP 工具"
// claude_desktop_config.json 配置示例
{
  "mcpServers": {
    "inspector_mcp__": {
      "command": "npx",
      "args": ["-y", "inspector"],
      "env": {
        // "API_KEY": "your-api-key-here"
      }
    }
  }
}

// 保存后重启 Claude Desktop 生效
MCP Inspector
The MCP inspector is a developer tool for testing and debugging MCP servers.
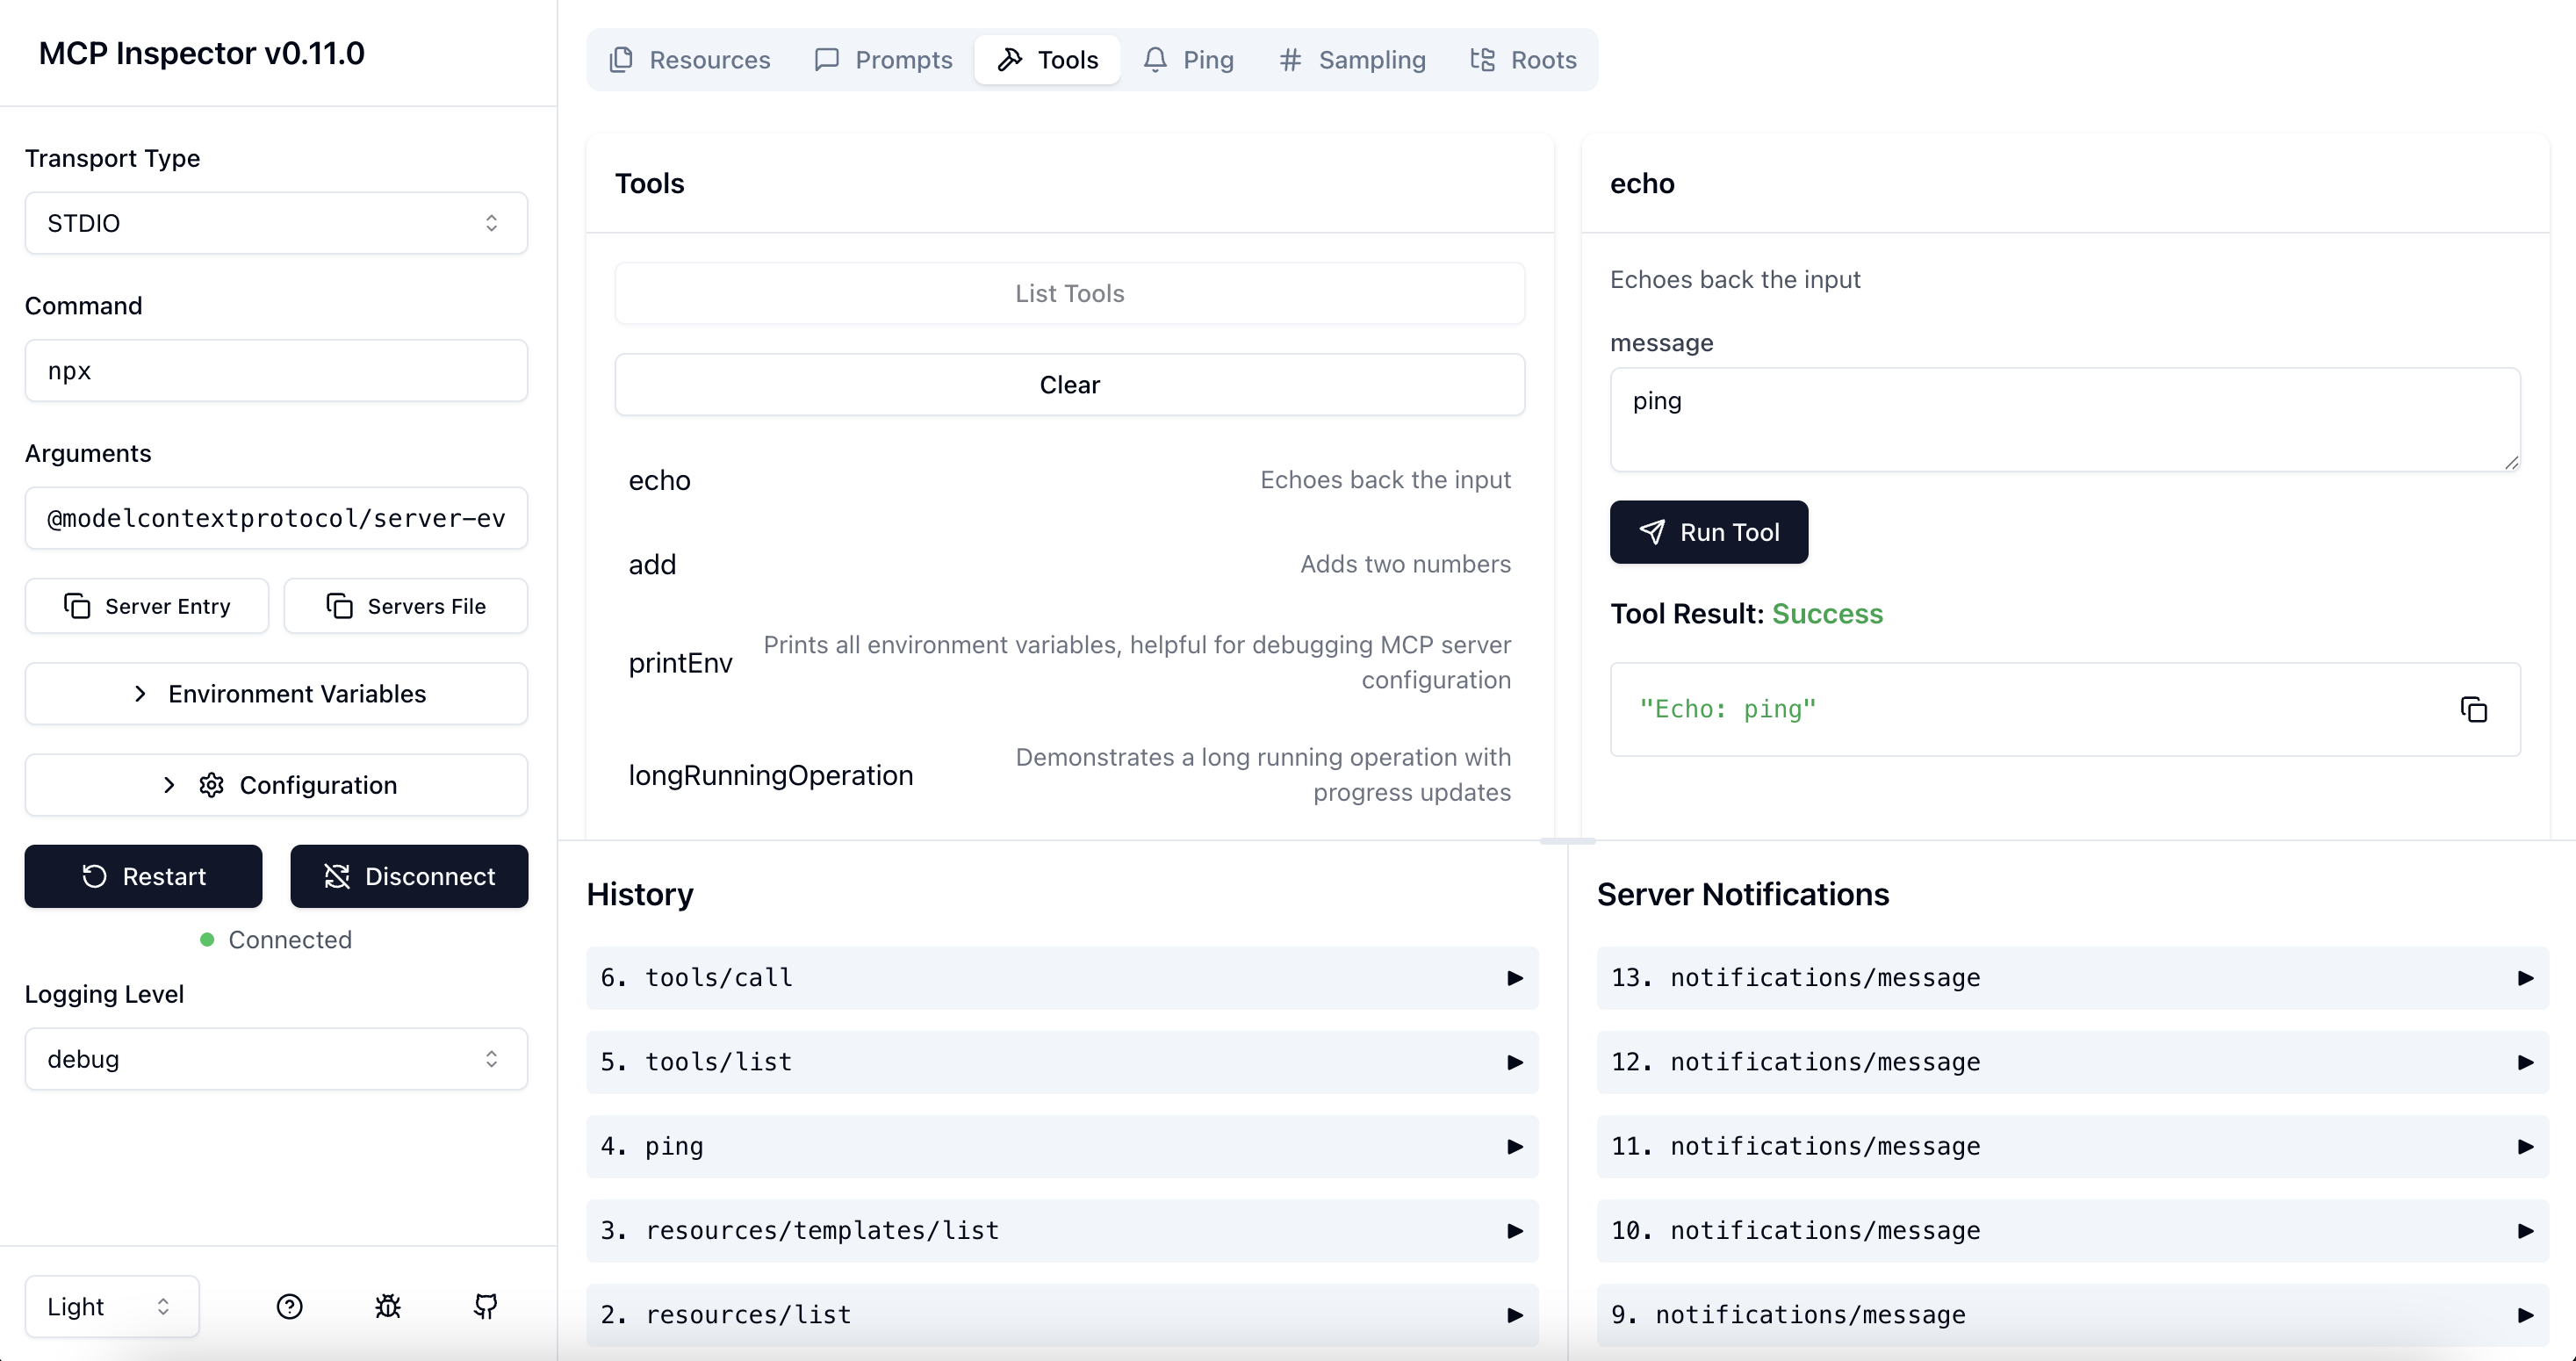
Architecture Overview
The MCP Inspector consists of two main components that work together:
- MCP Inspector Client (MCPI): A React-based web UI that provides an interactive interface for testing and debugging MCP servers
- MCP Proxy (MCPP): A Node.js server that acts as a protocol bridge, connecting the web UI to MCP servers via various transport methods (stdio, SSE, streamable-http)
Note that the proxy is not a network proxy for intercepting traffic. Instead, it functions as both an MCP client (connecting to your MCP server) and an HTTP server (serving the web UI), enabling browser-based interaction with MCP servers that use different transport protocols.
Requirements
- Node.js: ^22.7.5
Docker Container
You can also start it in a Docker container with the following command:
docker run --rm \
  -p 127.0.0.1:6274:6274 \
  -p 127.0.0.1:6277:6277 \
  -e HOST=0.0.0.0 \
  -e MCP_AUTO_OPEN_ENABLED=false \
  ghcr.io/modelcontextprotocol/inspector:latest
To go back to the deployed SDK version:
Quick Start (UI mode)
To get up and running right away with the UI, just execute the following:
npx @modelcontextprotocol/inspectorThe server will start up and the UI will be accessible at http://localhost:6274.
Basic usage
npx @modelcontextprotocol/inspector --cli node build/index.js
Tool Input Validation Guidelines
When implementing or modifying tool input parameter handling in the Inspector:
- Omit optional fields with empty values - When processing form inputs, omit empty strings or null values for optional parameters, UNLESS the field has an explicit default value in the schema that matches the current value
- Preserve explicit default values - If a field schema contains an explicit default (e.g.,
default: null), and the current value matches that default, include it in the request. This is a meaningful value the tool expects - Always include required fields - Preserve required field values even when empty, allowing the MCP server to validate and return appropriate error messages
- Defer deep validation to the server - Implement basic field presence checking in the Inspector client, but rely on the MCP server for parameter validation according to its schema
These guidelines maintain clean parameter passing and proper separation of concerns between the Inspector client and MCP servers.
Pass environment variables only
npx @modelcontextprotocol/inspector -e key=value -e key2=$VALUE2 node build/index.js
Pass both environment variables and arguments
npx @modelcontextprotocol/inspector -e key=value -e key2=$VALUE2 node build/index.js arg1 arg2
Configuration
The MCP Inspector supports the following configuration settings. To change them, click on the Configuration button in the MCP Inspector UI:
| Setting | Description | Default |
|---|---|---|
MCP_SERVER_REQUEST_TIMEOUT | Client-side timeout (ms) - Inspector will cancel the request if no response is received within this time. Note: servers may have their own timeouts | 300000 |
MCP_REQUEST_TIMEOUT_RESET_ON_PROGRESS | Reset timeout on progress notifications | true |
MCP_REQUEST_MAX_TOTAL_TIMEOUT | Maximum total timeout for requests sent to the MCP server (ms) (Use with progress notifications) | 60000 |
MCP_PROXY_FULL_ADDRESS | Set this if you are running the MCP Inspector Proxy on a non-default address. Example: http://10.1.1.22:5577 | "" |
MCP_AUTO_OPEN_ENABLED | Enable automatic browser opening when inspector starts (works with authentication enabled). Only as environment var, not configurable in browser. | true |
Note on Timeouts: The timeout settings above control when the Inspector (as an MCP client) will cancel requests. These are independent of any server-side timeouts. For example, if a server tool has a 10-minute timeout but the Inspector's timeout is set to 30 seconds, the Inspector will cancel the request after 30 seconds. Conversely, if the Inspector's timeout is 10 minutes but the server times out after 30 seconds, you'll receive the server's timeout error. For tools that require user interaction (like elicitation) or long-running operations, ensure the Inspector's timeout is set appropriately.
These settings can be adjusted in real-time through the UI and will persist across sessions.
The inspector also supports configuration files to store settings for different MCP servers. This is useful when working with multiple servers or complex configurations:
npx @modelcontextprotocol/inspector --config path/to/config.json --server everythingExample server configuration file:
{
  "mcpServers": {
    "everything": {
      "command": "npx",
      "args": ["@modelcontextprotocol/server-everything"],
      "env": {
        "hello": "Hello MCP!"
      }
    },
    "my-server": {
      "command": "node",
      "args": ["build/index.js", "arg1", "arg2"],
      "env": {
        "key": "value",
        "key2": "value2"
      }
    }
  }
}
Transport Types in Config Files
The inspector automatically detects the transport type from your config file. You can specify different transport types:
STDIO (default):
{
  "mcpServers": {
    "my-stdio-server": {
      "type": "stdio",
      "command": "npx",
      "args": ["@modelcontextprotocol/server-everything"]
    }
  }
}
SSE (Server-Sent Events):
{
  "mcpServers": {
    "my-sse-server": {
      "type": "sse",
      "url": "http://localhost:3000/sse"
    }
  }
}
Streamable HTTP:
{
  "mcpServers": {
    "my-http-server": {
      "type": "streamable-http",
      "url": "http://localhost:3000/mcp"
    }
  }
}
Default Server Selection
You can launch the inspector without specifying a server name if your config has:
- A single server - automatically selected:
```bash
With config file
npx @modelcontextprotocol/inspector --cli --config path/to/config.json --server myserver
To co-develop with the typescript-sdk package (assuming it's cloned in ../typescript-sdk; set MCP_SDK otherwise):
npm run dev:sdk "cd sdk && npm run examples:simple-server:w"
npm run unlink:sdk && npm i
> **Note for Windows users:**
> On Windows, use the following command instead:
>
>
Production mode:
CLI Mode
CLI mode enables programmatic interaction with MCP servers from the command line, ideal for scripting, automation, and integration with coding assistants. This creates an efficient feedback loop for MCP server development.
npx @modelcontextprotocol/inspector --cli node build/index.jsThe CLI mode supports most operations across tools, resources, and prompts. A few examples:
```bash
UI Mode vs CLI Mode: When to Use Each
| Use Case | UI Mode | CLI Mode |
|---|---|---|
| **Server Development** | Visual interface for interactive testing and debugging during development | Scriptable commands for quick testing and continuous integration; creates feedback loops with AI coding assistants like Cursor for rapid development |
| **Resource Exploration** | Interactive browser with hierarchical navigation and JSON visualization | Programmatic listing and reading for automation and scripting |
| **Tool Testing** | Form-based parameter input with real-time response visualization | Command-line tool execution with JSON output for scripting |
| **Prompt Engineering** | Interactive sampling with streaming responses and visual comparison | Batch processing of prompts with machine-readable output |
| **Debugging** | Request history, visualized errors, and real-time notifications | Direct JSON output for log analysis and integration with other tools |
| **Automation** | N/A | Ideal for CI/CD pipelines, batch processing, and integration with coding assistants |
| **Learning MCP** | Rich visual interface helps new users understand server capabilities | Simplified commands for focused learning of specific endpoints |
高质量开源MCP测试工具,近万星开源项目,可视化界面提升测试效率,TypeScript实现稳定可靠,活跃维护值得信赖。
- 需要让 Claude / Cursor 操作本地工具的 AI 工程师
- 配置 MCP 服务器时建议使用 stdio 传输 + JSON-RPC,避免暴露公网
- API key 直接提交到 git 仓库(请用 .env 并加入 .gitignore)
- MCP 配置路径拼错或权限不足,重启 Claude Desktop 才生效
- 云端托管:可放在 Vercel / Railway / Fly.io 等 PaaS 平台
⚡ 核心功能
- 通过标准 MCP 协议与 Claude、Cursor 等主流 AI 客户端深度集成
- 提供结构化工具调用接口,显著降低 AI 集成复杂度
- 支持 Claude Desktop 和 Claude Code 无缝接入,开箱即用
- 可与其他 MCP 工具组合叠加,构建完整 AI 工作站
- 轻量无侵入设计,不影响现有系统架构
- 需要让 Claude / Cursor 操作本地工具的 AI 工程师
- 配置 MCP 服务器时建议使用 stdio 传输 + JSON-RPC,避免暴露公网
- API key 直接提交到 git 仓库(请用 .env 并加入 .gitignore)
- MCP 配置路径拼错或权限不足,重启 Claude Desktop 才生效
👥 适合人群
🎯 使用场景
- 在 Claude Desktop 对话中直接调用本地工具,实现 AI 与系统的深度联动
- 通过自然语言驱动复杂的多步骤自动化任务,代替繁琐手动操作
- 将多个 MCP 工具组合使用,构建个人专属 AI 工作站
⚖️ 优点与不足
- +GitHub 9.8k Star,社区高度认可
- +标准化 MCP 协议,生态互联性强
- +与 Claude 官方生态无缝对接
- +即插即用,配置简单快捷
- −依赖 Claude 客户端,非 Claude 用户无法使用
- −MCP 协议仍在持续演进,接口可能变更
- −需要一定的配置步骤
该工具使用 NOASSERTION 协议,商用场景请仔细阅读协议条款,必要时咨询法律意见。
AI Skill Hub 为第三方内容聚合平台,本页面信息基于公开数据整理,不对工具功能和质量作任何法律背书。
建议在沙箱或测试环境中充分验证后,再部署至生产环境,并做好必要的安全评估。
📄 NOASSERTION — 请查阅原始协议条款了解具体使用限制。
🔗 相关工具推荐
❓ 常见问题 FAQ
总体来看,inspector MCP工具 是一款质量优秀的MCP工具,在同类工具中具备一定竞争力。AI Skill Hub 将持续追踪其更新动态,建议收藏备用,结合自身场景选择合适时机引入使用。
| 原始名称 | inspector |
| 原始描述 | 开源MCP工具:Visual testing tool for MCP servers。⭐9.8k · TypeScript |
| Topics | MCP测试工具可视化调试TypeScript开源 |
| GitHub | https://github.com/modelcontextprotocol/inspector |
| License | NOASSERTION |
| 语言 | TypeScript |
收录时间:2026-05-14 · 更新时间:2026-05-16 · License:NOASSERTION · AI Skill Hub 不对第三方内容的准确性作法律背书。